Unihiker K10 Lesson 2
Introduction:
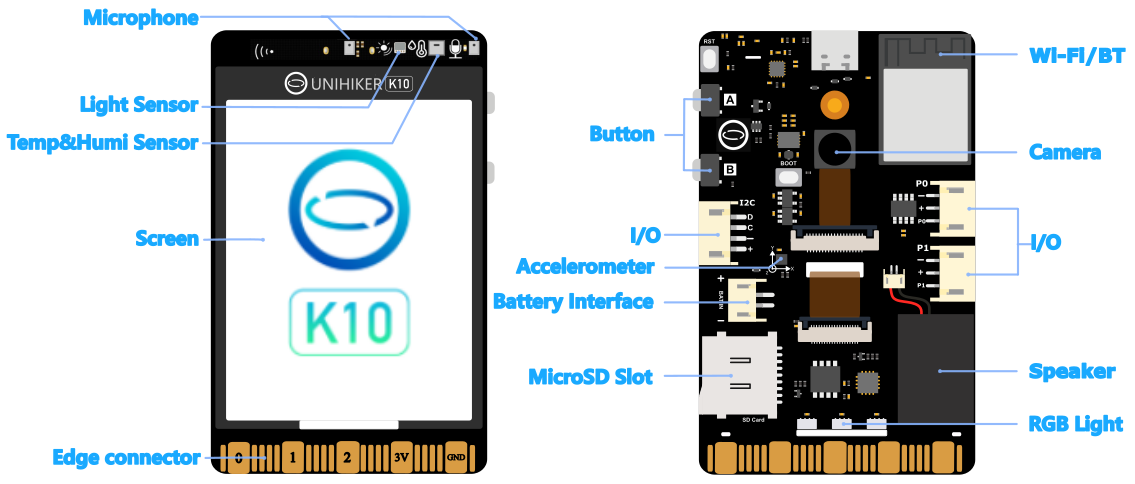
The UNIHIKER K10 features a rich 2.8-inch touchscreen display that opens up exciting possibilities for building interactive user interfaces (UI). In this lesson, you’ll learn how to create graphical elements such as buttons, shapes, and text on the screen using MicroPython. We’ll also cover how to detect physical button presses or screen touches to create interactive behavior. This is a crucial first step toward building applications like menu-driven dashboards, educational tools, or even touchscreen games.
Why Learn UI Design on UNIHIKER?
Understanding how to manipulate the screen is foundational for most user-facing applications. Whether you’re designing a settings menu, data visualization dashboard, or media player, you’ll need to control where elements appear and how the user interacts with them. The pinpong library on UNIHIKER makes these tasks simple and intuitive.
Getting Started: Drawing UI Elements
pythonCopyEditfrom pinpong.board import Board
from pinpong.libs.unihiker import GUI

Board().begin()
screen = GUI()

# Clear the screen
screen.clear()

# Draw title
screen.draw_string(80, 20, "My First UI", scale=2)

# Draw buttons
screen.draw_rect(40, 100, 100, 40, fill=True, color=(0, 150, 255))
screen.draw_string(60, 110, "Next")

screen.draw_rect(180, 100, 100, 40, fill=True, color=(255, 100, 100))
screen.draw_string(200, 110, "Back")
This example creates two rectangular buttons labeled “Next” and “Back”. You can change the positions and colors to match your project style.
Adding Interactivity:
Let’s add a response to the built-in physical button (P0):
pythonCopyEditfrom pinpong.board import Pin
import time

btn_a = Pin("P0", Pin.IN)

while True:
    if btn_a.value() == 0:
        screen.draw_string(80, 160, "Button A pressed!", color=(0, 255, 0))
        time.sleep(0.3)
Every time you press the button, the screen will display a message. You could extend this by linking it to a menu switch or triggering other actions.
Tips for UI Layout:
- Use consistent spacing and color schemes.
- Keep labels clear and readable by adjusting
scaleor color. - Use
screen.clear()wisely—avoid clearing the whole screen too frequently to prevent flickering.
Conclusion:
This lesson gives you the foundation to start building touch-friendly apps on the UNIHIKER K10. Experiment with layouts, and try designing a basic calculator or menu selector next. In the upcoming lesson, we’ll combine these UI techniques with audio controls to build an interactive music player.
Tag:lesson